Atlas Assets v3.0.0 Release Notes
Safety & Risk Management • Inventory Management • Document Reminders • Smarter Help Desk Workflows • Clearer Asset IdentificationAtlas Assets v3.0.0 is a major release focused on strengthening everyday operational control across safety, stock management, internal workflows, reporting, and document tracking.
The two biggest additions in this version are the introduction of a dedicated Safety & Risk Management area and the launch of a full Inventory Management module. Together, these additions help organisations record and monitor important operational activity more effectively, assign responsibility clearly, track actions to completion, and maintain stronger day-to-day visibility across stock, incidents, risks, and support workflows.
This release also introduces improved Document Reminders with support for both one-off and recurring reminders, improves the Help Desk experience by reducing unnecessary communications during ticket creation, adds asset-type prefixes for clearer identification across the system, and makes ticket conversations easier to follow by adapting messages to the recipient.
At a Glance
New Safety & Risk Management area with Overview, Incidents, and Risks
- Document Reminders with support for one-off and recurring reminders
New full Inventory Management module with Usage & Disposal, Overview, Stock movements, Orders, Categories, and Custom report
Incidents with corrective actions, owners, due dates, and notifications
Risks with mitigation actions, review dates, and overdue tracking
Inventory item setup with stock, supplier, category, storage, batch, expiry, and minimum stock controls
FIFO / FEFO batch handling per item, with warnings if the wrong batch is selected during usage/disposal
Responsive Usage & Disposal screen for desktops, laptops, tablets, smartphones, and touch devices
Support for barcode scanning, hand scanners, and QR readers
Stock Movements for full traceability and audit history
Orders to support replenishment workflows
Low stock, out-of-stock, and expired item visibility
Technician assignment and ticket status during ticket creation
Consistent asset prefixes across asset types
Ticket messages adapted to the recipient for clearer communication
What’s New in v3.0.0?
Safety & Risk Management
What’s New
A dedicated Safety & Risk Management area has been introduced with three menu items:
Overview – a combined dashboard for trends, open actions, severity breakdown, and overdue items
Incidents – a structured incident register with corrective actions and due dates
Risks – a risk register with mitigation actions and review cycles
This module is built to improve accountability, reduce manual chasing, and make audits/inspections easier by keeping everything consistent and reportable.
How to use it
Go to Safety & Risk Management in the main menu.
Choose one of:
Overview for a quick snapshot
Incidents to record and manage incidents
Risks to record and manage risks
Use the built-in filters:
Category filters
Quick date ranges such as Today, 15 days, 30 days, Current Month, 3 Month, 6 Month, 1 Year, 2 Years, Custom
Use Export Results (where available) to support reporting, governance meetings, and inspections.
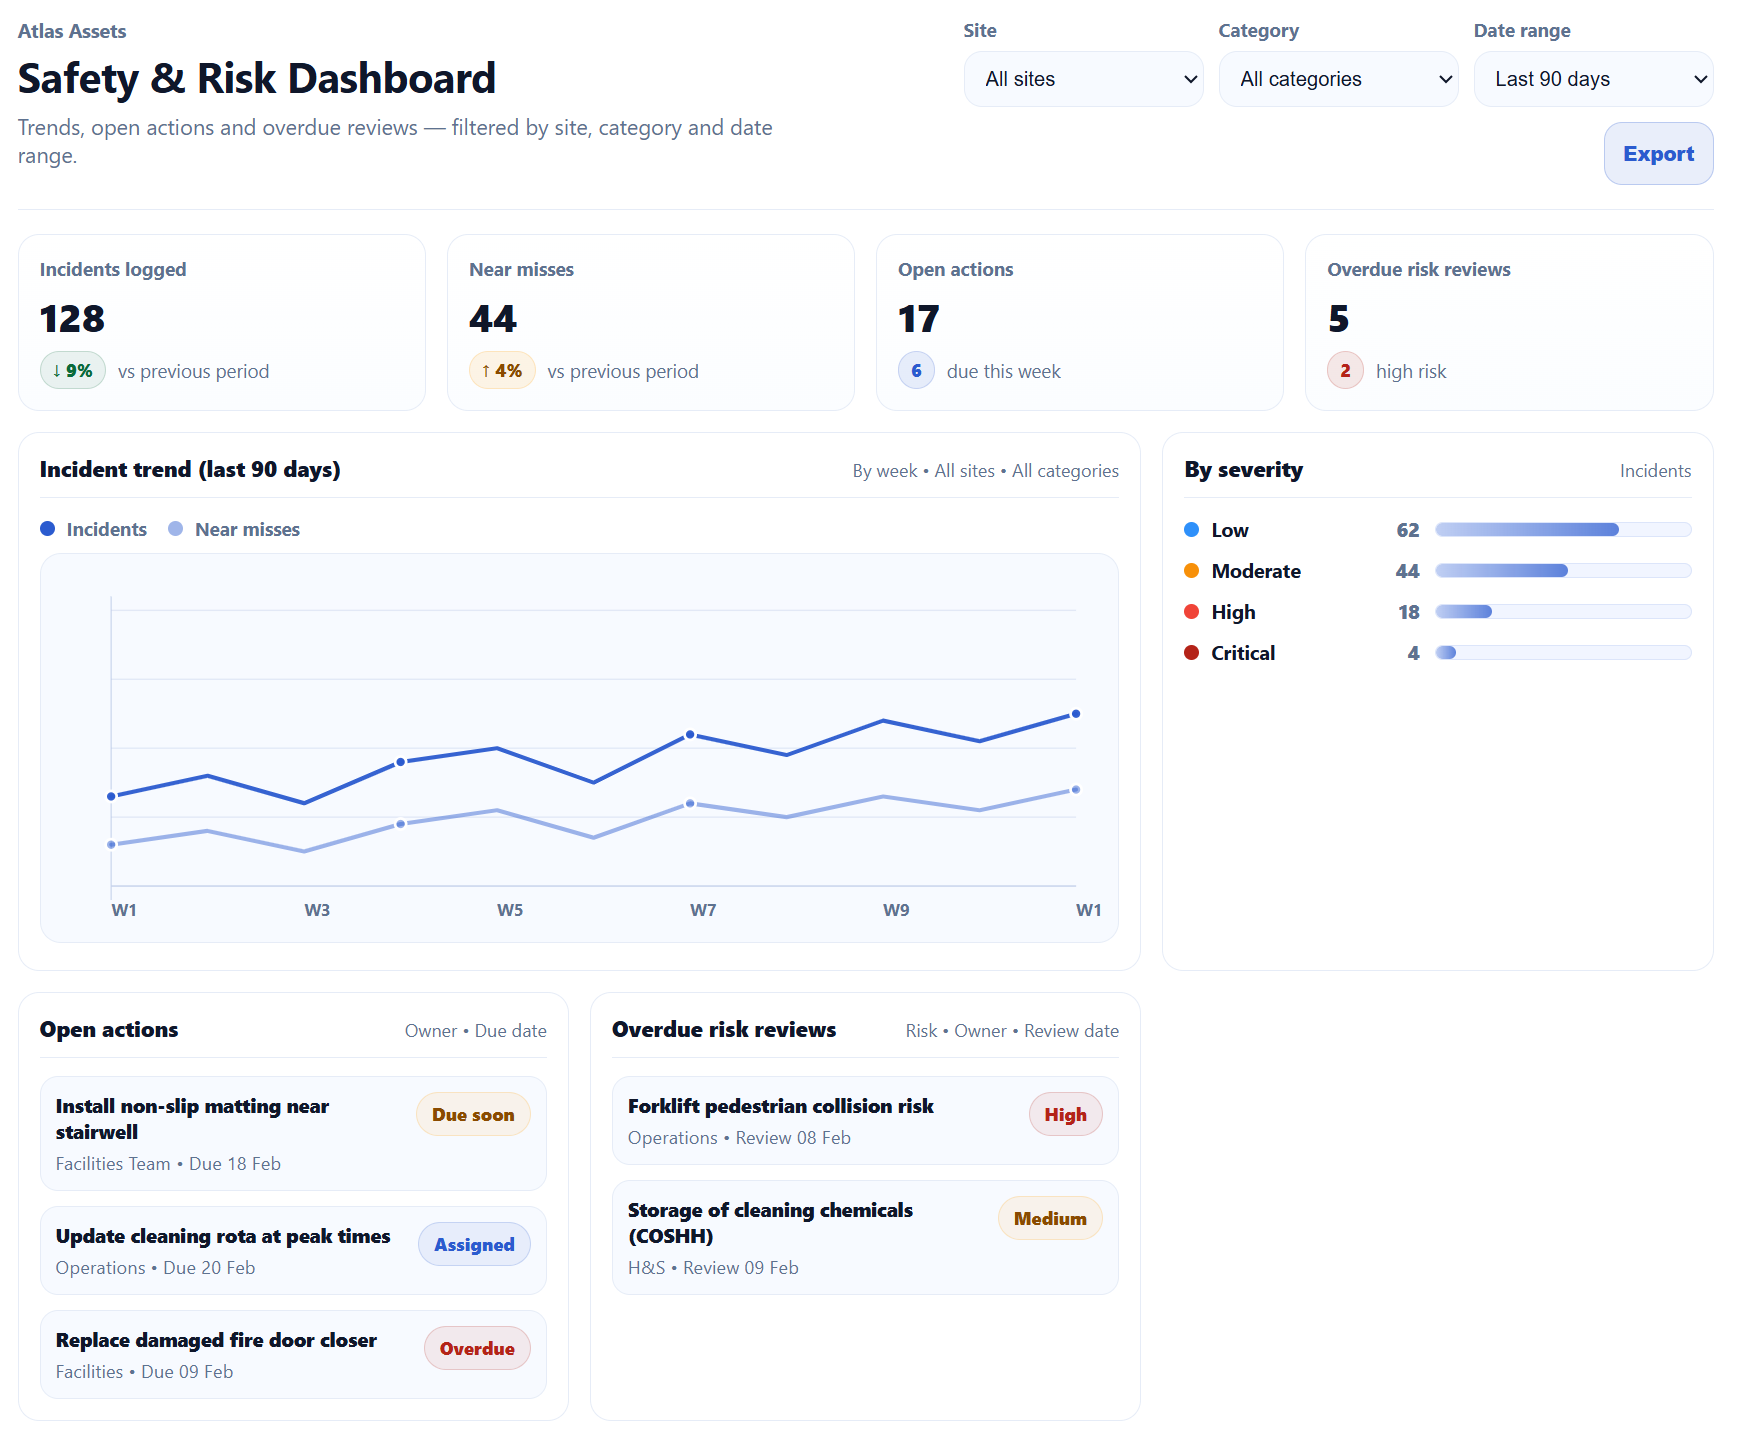
Overview: Safety & Risk Dashboard
What’s New
The new Overview dashboard provides a combined view of safety activity so teams can quickly spot what needs attention.
Includes:
Summary tiles for Incidents logged, Risks, Open actions, and Overdue mitigations
A trend chart comparing Incidents vs Risks
A By severity breakdown (Low / Moderate / Major / Critical)
Quick lists for:
Open actions (owner + due date)
Overdue mitigations (risk + owner + review date)
How to use it
Go to Safety & Risk Management → Overview.
Set the date range to match your reporting period (e.g., Current Month or 6 Month).
Review:
Severity distribution to prioritise high-impact items
Open actions and overdue mitigations to focus follow-up
Click through to Incidents or Risks to manage the underlying record(s).
Incidents: Incident Register with Corrective Actions
What’s New
You can now record incidents in a structured register and manage follow-up through Corrective Actions (with owners and due dates). The page also includes KPI tiles and reporting tools to make monitoring straightforward.
Key highlights:
KPI tiles (e.g., Total, Open, Investigating, Resolved, Overdue actions, Critical in the last 30 days)
Filters for search, severity, status, and category
A clear table including Corrective actions counts and Next action date
Export Results for reporting and audit evidence
Email + in-app notifications for due dates and overdue corrective actions
How to use it
Go to Safety & Risk Management → Incidents.
Click New Incident.
Record the incident details (what happened, when, where, category, severity, any supporting notes).
Assign ownership:
Set the Assigned to user/team
Add follow-up tasks:
Add one or more Corrective Actions
Set due dates for each action
Track progress:
Use Next action date and Corrective actions count to monitor what’s still outstanding
Export when needed:
Filter by period/category/severity and click Export Results for governance packs or inspection evidence.

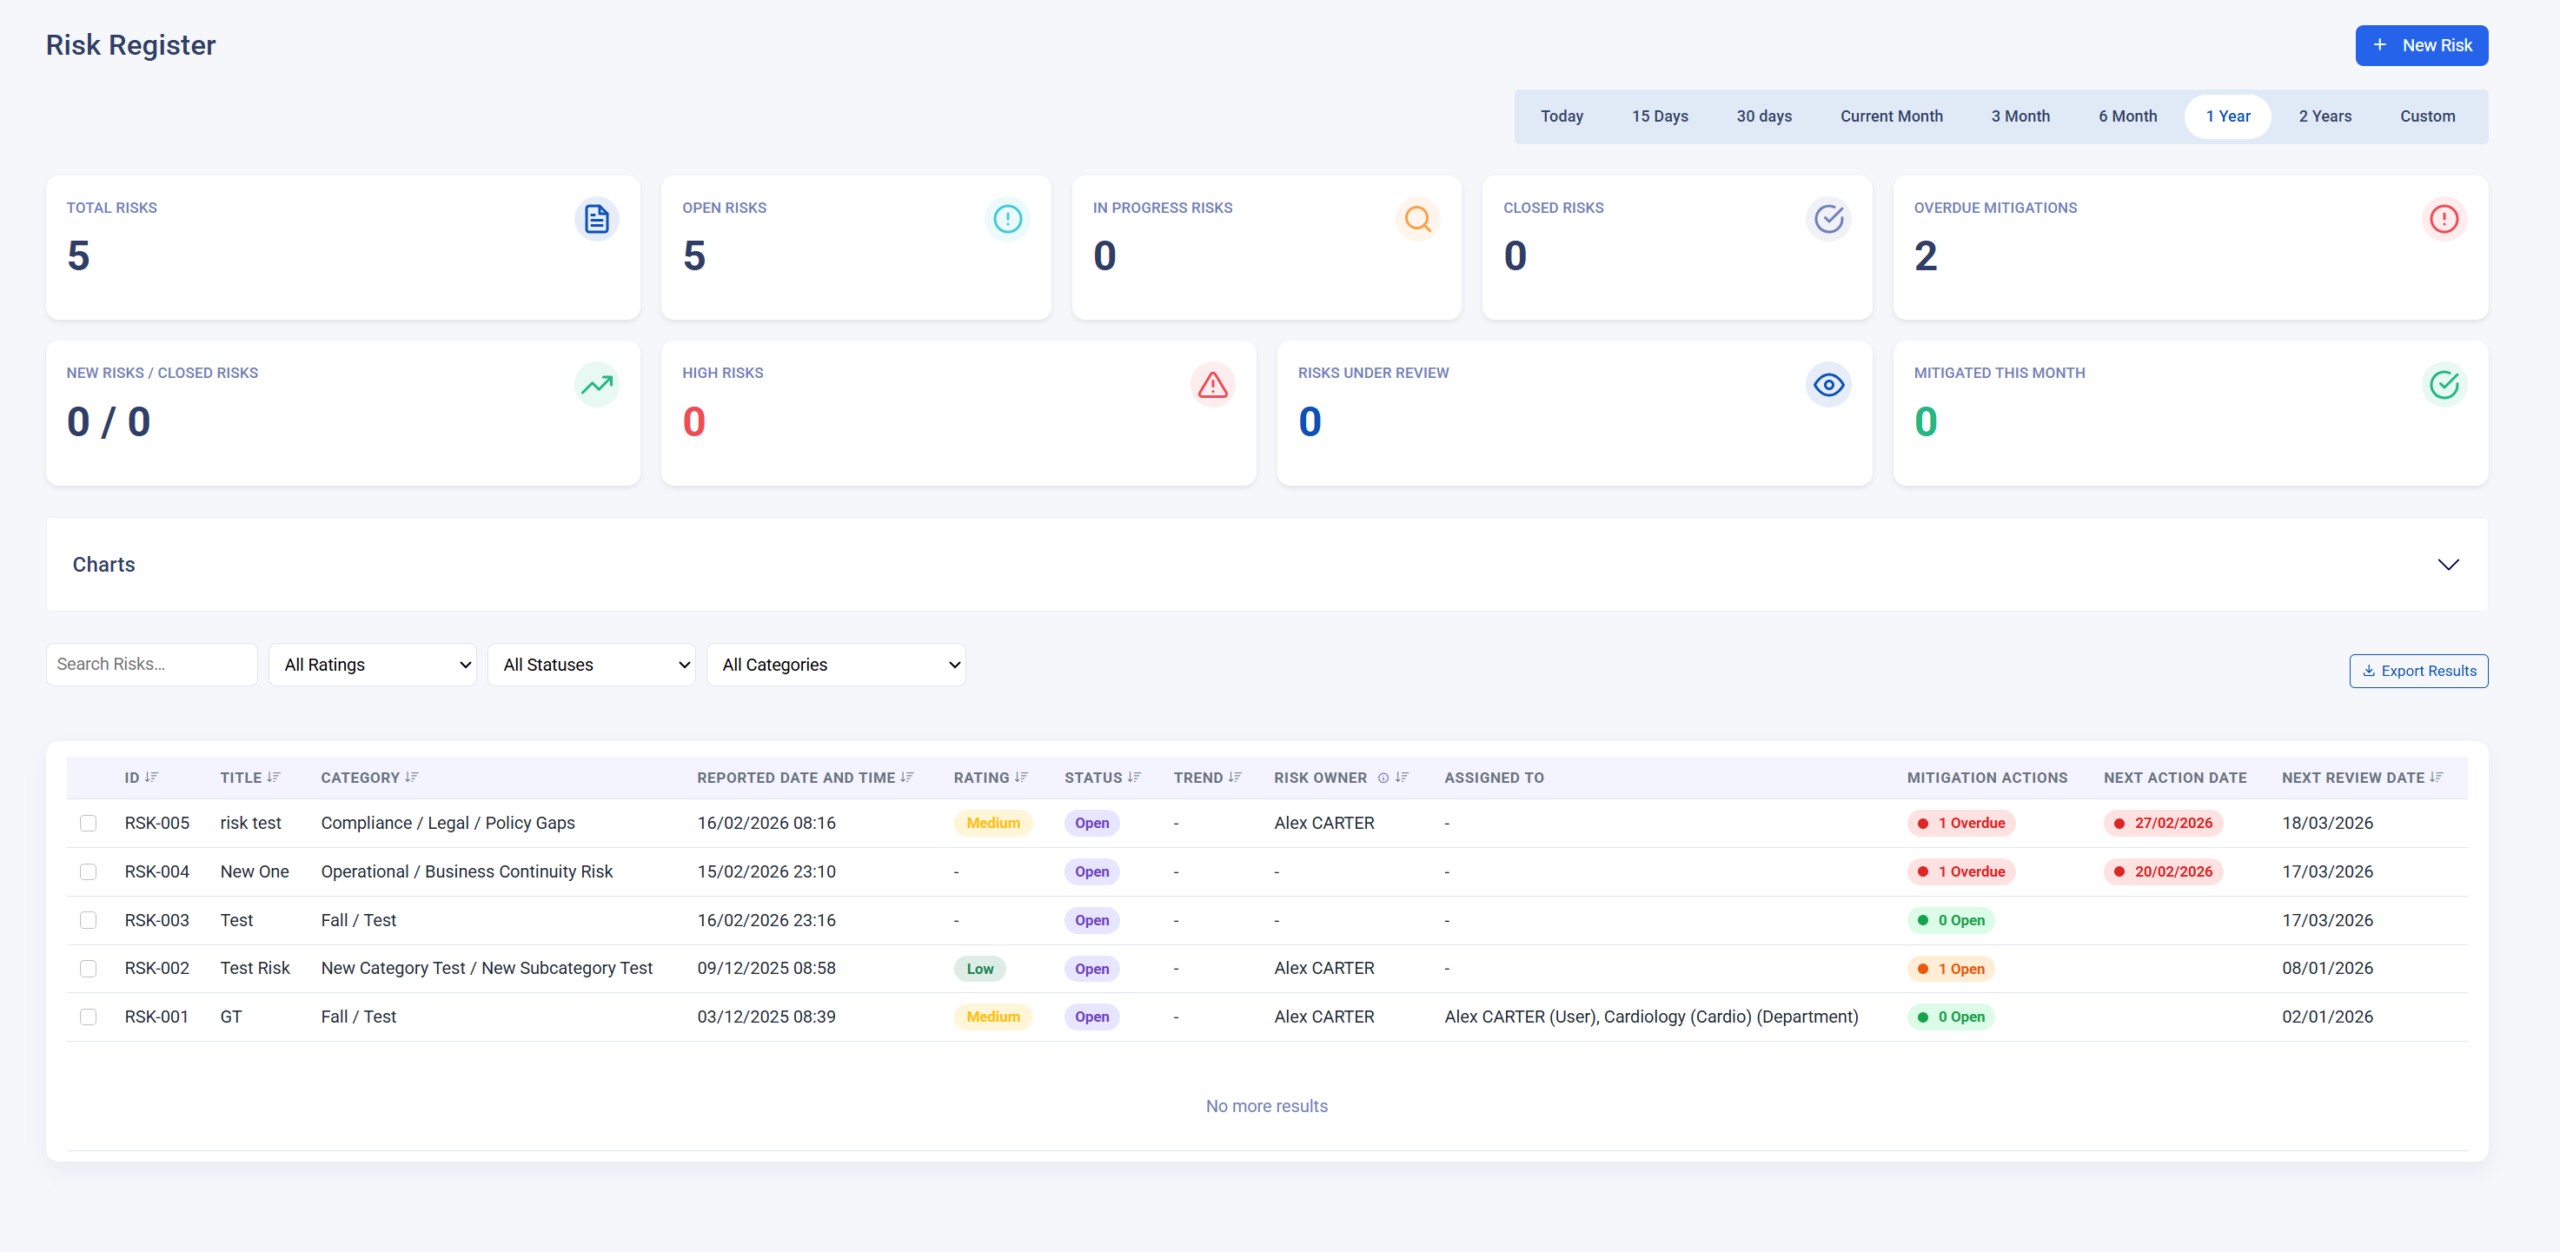
Risks: Risk Register with Mitigation Actions and Review Dates
What’s New
Atlas Assets now includes a full Risk Register with ownership, action tracking, and review discipline—ideal for routine governance and audit readiness.
Key highlights:
KPI tiles (e.g., Total, Open, In progress, Closed, Overdue mitigations)
Monitoring tiles (e.g., High risks, Risks under review, Mitigated this month)
Filters for search, rating, status, and category
Action & review tracking fields including Mitigation actions, Next action date, and Next review date
Email + in-app notifications for mitigation due dates and overdue mitigations
Export Results for audit trails, committee packs, and inspection documentation
How to use it
Go to Safety & Risk Management → Risks.
Click New Risk.
Record the risk details (title, description, category, rating, status, trend as applicable).
Assign ownership:
Set a Risk Owner
Optionally set Assigned to for operational follow-up
Add follow-up tasks:
Add one or more Mitigation Actions
Set due dates and track progress
Set the review cycle:
Maintain the Next review date so risks are revisited consistently
Export when needed:
Filter by period/category/rating and click Export Results for governance and inspections.
CQC inspection readiness: what this enables
What’s New
With Risks, Incidents, actions, ownership, due dates, notifications, and exports, Atlas Assets v3.0.0 helps clinics evidence the operational controls typically reviewed during inspections.
How to use it for inspections/audits (practical approach)
Use Risks to maintain a living risk register (including review dates and mitigation tracking).
Use Incidents to record events consistently and demonstrate follow-up via corrective actions.
Use Overview to show oversight: trends, severity distribution, open items, and overdue actions.
Use Export Results to create inspection packs for defined periods (e.g., last 3-6 months).
Use notifications to demonstrate that deadlines are actively monitored and managed.
Inventory Management Module
What’s New
Atlas Assets v3.0.0 introduces a full Inventory Management module, designed to help organisations record stock properly, monitor quantities and expiry dates, manage usage and disposal, and maintain a clear audit trail of stock activity.
This is a practical operational module for organisations that need stronger stock control, clearer traceability, and more effective day-to-day inventory management across stores, departments, teams, and service areas.
The Inventory menu includes:
Usage & Disposal
Overview
Stock movements
Orders
Categories
Custom report
Together, these pages provide a complete workflow for inventory setup, stock monitoring, movement tracking, replenishment, organisation, and reporting.
How to Use It
Go to Inventory from the main menu and choose the page that matches the task:
Usage & Disposal to record stock usage and disposal
Overview to monitor stock levels, expiry, and shortages
Stock movements to review movement history
Orders to manage replenishment workflows
Categories to organise items
Custom report to generate flexible reports
Inventory Item Setup and Stock Control
What’s New
Each inventory item can now be configured as a proper stock record, rather than just a simple item name.
The item setup supports fields such as:
name
colour
code
barcode
warehouse location
purchase date and time
risk
category
description
supplier
retail price
stock
minimum stock level
This provides the foundation for stronger stock control and more useful reporting.
How to Use It
Create or open an inventory item.
Complete the item details, including stock, supplier, category, and storage information.
Set the minimum stock level to support replenishment monitoring.
Add expiry and batch settings where applicable.
Batch Management with FIFO and FEFO per Item
What’s New
Batch management can be configured per inventory item, allowing organisations to choose the most suitable handling method depending on the item.
The item screen supports:
enabling Inventory Batches
recording Batch Details
recording Expiry Date
setting Notification Days
choosing the Batch Consumption Mode
allowing staff to override the preferred batch
requiring a reason for override
The supported batch consumption modes are:
FIFO – First In, First Out
FEFO – First Expired, First Out
At the point of usage or disposal, the system does not simply force the batch selection. Instead, it can warn the user if the wrong batch is selected, helping teams follow the correct stock rotation process while still allowing controlled override where appropriate.
How to Use It
Open the inventory item record.
Enable Inventory Batches where needed.
Enter the batch number, expiry date, and notification days.
Select the appropriate Batch Consumption Mode for that item.
Decide whether override should be allowed, and whether a reason should be required.
When the item is later used or disposed of, the system will warn the user if the selected batch does not match the preferred handling logic.
Usage & Disposal
What’s New
The Usage & Disposal page is designed for fast, practical stock handling in real operational environments.
It works across:
desktop computers
laptops
tablets
smartphones
touch-screen devices
Users can record stock movements quickly using:
a barcode scanner / hand scanner
a QR reader
manual on-screen controls
This makes it easier to record what has been used or disposed of without relying on a fixed workstation.
How to Use It
Go to Inventory → Usage & Disposal.
Scan the barcode or QR code, or select the item manually.
Adjust the quantity using the on-screen controls.
If the item uses batch management, review any batch warning shown by the system.
Confirm the movement.
The stock is updated and the movement is added to the stock history.
Inventory Overview
What’s New
The Overview page provides a quick operational summary of stock status in one place.
It includes visibility of:
Total items
Low stock products
Out-of-stock items
Expired items
It also includes a stock table showing:
item name
description
supplier
code
retail price
current stock
reserved stock
minimum stock level
expiry date
storage location
risk
This makes it easier to identify shortages, stock risks, and items that need attention.
How to Use It
Go to Inventory → Overview.
Review the summary widgets at the top of the page.
Use the stock table to:
check current stock
review reserved quantities
identify low stock items
spot expired or expiring items
review risk and storage information
Use this page regularly for stock checks and replenishment planning.
Stock Movements
What’s New
The Stock movements page provides a full movement history, giving organisations a clearer audit trail of inventory activity.
The page shows:
Date / Time
Type
User
Items
Total Quantity
Status
Actions
This helps teams understand what was recorded, when it happened, who recorded it, and how much stock was involved.
How to Use It
Go to Inventory → Stock movements.
Use the available filters, such as:
search
type
status
user
Review the movement history table.
Export results where needed.
Use the available actions to manage records where permitted.
Orders
What’s New
The Orders page supports replenishment and purchasing workflows, helping organisations manage stock ordering in a more structured way.
It is intended to support:
low stock replenishment
out-of-stock response
routine stock ordering
continuity of supply
How to Use It
Go to Inventory → Orders.
Review items that require replenishment.
Create and manage stock orders through your internal process.
Use the Orders page alongside stock thresholds and the Overview page to maintain supply.
Expiry Date Monitoring and Notification Days
What’s New
The Inventory module includes clearer expiry-related monitoring through:
Expiry Date
Notification Days
This helps organisations identify stock that is approaching expiry and take action early.
How to Use It
Open the inventory item record.
Enter the Expiry Date where relevant.
Set the Notification Days value.
Use the Overview page and item records to monitor stock that needs attention.
Low Stock Monitoring and Replenishment Support
What’s New
The Inventory module supports more proactive stock control by combining:
current stock
reserved stock
minimum stock level
low stock visibility
out-of-stock visibility
This helps organisations respond earlier and manage replenishment more effectively.
How to Use It
Keep stock quantities and minimum stock levels up to date per item.
Use the Overview page to identify low stock and out-of-stock items.
Use the Orders page to support timely replenishment.
Categories
What’s New
The Categories page allows organisations to structure inventory into meaningful groups, making the module easier to manage as stock grows.
This supports:
clearer organisation
easier filtering
better reporting
improved scalability
How to Use It
Go to Inventory → Categories.
Create and manage the categories that suit your organisation.
Assign items to the relevant category to improve organisation and reporting.
Custom Report
What’s New
The Custom report page gives organisations more flexibility in how inventory data is reviewed and presented.
This can support reporting on:
stock levels
expiry dates
low stock items
stock movements
usage patterns
category-based analysis
How to Use It
Go to Inventory → Custom report.
Choose the report criteria you need.
Generate the report for internal review, audits, purchasing decisions, or management reporting.
Document Reminders – One-off and Recurring
What’s New
Atlas Assets v3.0.0 introduces more flexible Document Reminders, allowing users to create reminders either as one-off reminders or as recurring reminders.
This makes document tracking more practical for organisations that need to review documents on a regular basis, whether that is annually, every few months, or on another defined schedule. Instead of creating a new reminder manually each time, users can now set the reminder once and manage it in a clearer and more structured way.
This update is particularly useful for documents that need repeated review, renewal, or follow-up, helping teams stay organised and reducing the risk of missed deadlines.
How to Use It
- Open the relevant document and go to the reminder setup area.
- Set the Expire Date for when the document next needs to be reviewed.
- Choose Notify By to define how long in advance you want to be notified.
- Select the Reminder Type:
- One-off for a single reminder
- Recurring for repeated reminders
- If Recurring is selected, define how often the reminder should repeat.
- Choose how the recurring reminder ends:
- after a set number of repeats
- or on a defined end date
- Save the reminder.
This gives organisations a more sustainable way to manage document reviews, renewals, and routine checks without unnecessary manual follow-up.
Improvements in the ticket creation process
What’s New
The Help Desk workflow now supports assigning responsibility and status at the point of creation:
You can assign a technician during ticket creation
You can set the ticket status during creation
The process is consolidated so that only one email/notification is sent, reducing communication noise compared to the previous “one action = one message” behaviour
How to use it
Go to Help Desk → Tickets → Create Ticket.
Enter the ticket details.
Before saving:
Select the Technician/Assignee
Set the Status (e.g., New / Assigned / In progress)
Save the ticket – assignment and status are applied immediately.
Asset type prefixes added across the system
What’s New
All assets now have clear, consistent prefixes for faster recognition in lists, search, and exports.
Prefixes
Buildings → BL
Equipment → EQ
Furniture → FU
Devices → DV
Group Devices → GD
Document Library → DL
Software Licences → SL
Fleet → FL
How to use it
Create and view assets as normal – prefixes appear automatically alongside asset records.
Use prefixes to speed up internal communication (e.g., “Please check EQ-… at Site A”).
Use prefixes in searches and exports to segment asset types quickly.
Ticket messages now adapt to the recipient
What’s New
Ticket conversations are now easier to read. Messages adapt based on the recipient, improving clarity when different roles are involved (requesters, technicians, managers).
How to use it
No change to your workflow – continue posting ticket updates as usual.
The thread presentation adjusts to improve readability for the person viewing/receiving the message.
💡 Explore and Discover
Atlas Assets v3.0.0 brings structured risk and incident governance, reduces admin effort through smarter ticket creation, and improves clarity with asset prefixes and clearer ticket communication-while also providing stronger evidence and reporting to support audits and CQC inspection readiness.
Crafted with Passion by the MD IT Team
🔁 Refined by Feedback. ⚡ Powered by You.
What to Do if You Notice Any Issues?
While we have diligently tested every function, we understand that unexpected issues may arise. If you come across any functionality that is not working as expected, please don’t hesitate to reach out to us via:
Email: Support@mdit.uk
Help Desk: https://support.mdit.uk
London: +44 (0) 1233 556 569
Athens: +30 210 897 6368
Dublin: +353 (1) 968 2555
We value your feedback and are committed to resolving any issues promptly to ensure a smooth experience for all users.
